
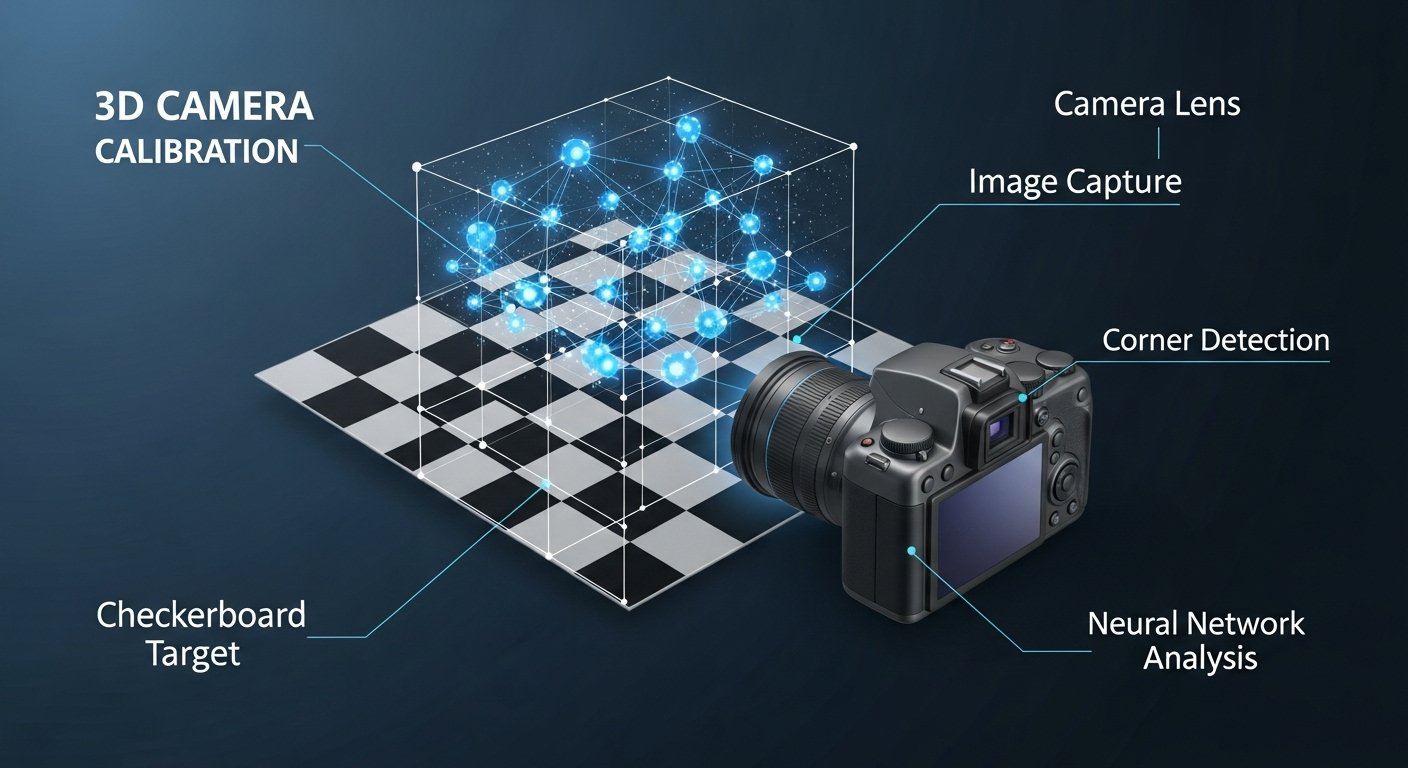
Imagine you take a single photo and from that alone, you determine exactly how your camera saw the world — its focal length, lens distortion, orientation, even its position relative to the scene. That’s the promise of 3D camera calibration from a photo AI. In a world where augmented reality, robotics, autonomous vehicles, and computer vision are rising fast, being able to calibrate cameras quickly and accurately is more important than ever. Traditional methods often require multiple images, specialized calibration patterns or controlled setups. But recent advances in AI and geometry are enabling calibration from a single photo — dramatically simplifying the workflow.
In this article, we’ll explore what “3D camera calibration from a photo AI” means, how the technology works, why it matters for real-world applications, the challenges you’ll face, and how you might implement or incorporate it. Whether you’re a developer, researcher, hobbyist, or just curious about how your smartphone or camera “knows” how it’s oriented, this deep dive will give you a practical, clear overview.
What is 3D Camera Calibration from a Photo AI?
“3D camera calibration from a photo AI” refers to methods that use a single image (or very limited images) and artificial intelligence (typically deep learning) to estimate the camera’s intrinsic and extrinsic parameters, plus lens distortions — the elements needed to map 3D scene geometry onto that 2D image.
Let’s break that down:
-
Camera calibration: The process of finding the camera’s internals (intrinsic parameters like focal length, principal point, skew; plus distortion coefficients) and extrinsics (rotation & translation relative to the scene) so you know how 3D points in the world project onto the image sensor.
-
3D: Means we’re concerned with the full 3D geometry of the camera relative to the scene, not just a 2D homography.
-
From a photo: Rather than needing multiple images from different viewpoints, or a special calibration object in many poses, this technique tries to compute as much as possible from one image.
-
AI: Deep learning or other AI models are used to infer or assist in estimating calibration parameters, often by learning from large datasets or by leveraging learned visual cues.
Recent research has shown that by combining geometric reasoning (lines, vanishing points, distortion, scene cues) with AI-based prediction, you can get surprisingly good calibration from a single frame. For example, the work “GeoCalib: Learning Single‑image Calibration with Geometric Optimization” uses a combination of deep network and geometry to improve single-image calibration.
Similarly, “A Perceptual Measure for Deep Single Image Camera Calibration” showed that a CNN trained on panoramas can infer calibration from a single image.
Thus, the phrase “3D camera calibration from a photo AI” summarizes this ability: calibrating the camera (3D) using one photo and AI.
Why 3D Camera Calibration from a Photo AI Matters
Here are some of the key reasons this topic is important — and why you should care if you work with images, cameras, or 3D.
Faster, easier setup
Traditional calibration workflows often require capturing many images of a known calibration pattern (checkerboard, circle grid) in different orientations and distances. That takes time. With single-image or AI-assisted calibration, you might only need one photo and let the model infer the rest. That’s a huge productivity win.
Field‐ready and less constrained
Some scenarios (drones, mobile AR, quick deployment on a robot) don’t allow you to hang up a checkerboard or take dozens of calibration shots. A method that works from a photo is far more practical in ‘in-the-wild’ settings.
Supports downstream 3D tasks
Good calibration is foundational for tasks such as:
-
3D reconstruction and modelling
-
Augmented reality object insertion
-
Robotics vision and navigation
-
Visual localization and mapping
If your calibration is off, every downstream task suffers (objects will misalign, 3D points will warp, AR will “float”). Methods like GeoCalib specifically target such downstream robustness.
Better handling of uncontrolled conditions
AI-augmented calibration can pick up cues from real-world messy images (uneven lighting, irregular scenes) rather than ideal lab setups. This means more realistic application domains.
Enables new workflows
For example: You upload a photo of a scene, the system calibrates the camera, then you insert 3D furniture, or measure distances. One photo, full workflow.
So in short: this topic is at the intersection of camera modelling + AI + real-world practicality.
How 3D Camera Calibration from a Photo AI Works
Let’s go deeper into how you actually calibrate a camera from one image using AI and geometry. I’ll walk through the major steps and techniques, so you understand what’s happening under the hood.
Intrinsic vs Extrinsic Parameters
First, recall the two broad parameter sets in calibration:
-
Intrinsics: focal length (or field of view), principal point (center of projection), skew (rare), aspect ratio, distortion coefficients (radial, tangential).
-
Extrinsics: The rotation and translation of the camera relative to world/scene coordinates — basically where the camera is in 3D and how it’s oriented.
The goal: from the image you have, estimate as many of these unknowns as possible.
Why a Single-Image Calibration is Challenging
When you have multiple images (or a moving camera), you can use stereo/tracking/multiple viewpoints to triangulate and reconstruct geometry (see e.g. structure-from-motion). But with one image, you only have one projection of each scene point. That inherently reduces the constraints. Wikipedia notes that reconstructing 3D from multiple images is far easier because you get intersection of rays; one image leaves ambiguity.
What does that mean in practice? It means you need extra assumptions or cues:
-
Known geometry in the scene (e.g., a checkerboard).
-
Vanishing points and line directions indicating orientation.
-
Scene semantic cues (floor/ceiling, gravity direction).
-
Lens distortion features.
-
Learning from large data: an AI model can infer camera intrinsics by ‘seeing’ patterns in many training images.
AI Meets Geometry: Hybrid Approaches
Modern work on “3d camera calibration from a photo ai” uses both:
-
Deep learning: Train a network on large datasets of images with known calibration parameters. Input the single image → output predicted intrinsics/extrinsics. Example: the Hold-Geoffroy et al. paper directly infers focal length and distortion from one image.
-
Geometric optimisation: Use predicted parameters as initial values, then refine using geometric constraints like straight lines, vanishing points, checkerboard corners, etc. For example, GeoCalib uses an optimisation layer after the network to refine results.
-
Hybrid calibration object + AI: Some methods still assume a calibration pattern is present, but reduce the number of required images to just one. For instance, “A High-Quality and Convenient Camera Calibration Method Using a Single Image” uses a checkerboard and a single image.
-
Full in-the-wild single image calibration: No special pattern; rely purely on scene cues + AI. Example: the “Deep-BrownConrady” work predicts calibration parameters using synthetic + real images.
Step-By-Step Workflow
Here’s a representative workflow for “3d camera calibration from a photo ai”:
-
Capture or supply a single image of your scene/camera.
-
Pre-process: maybe detect key features: edges, lines, corners, scene semantics (floor, walls), distortions.
-
AI inference: feed the image (or features) into a deep model that outputs estimated intrinsics (e.g., focal length, principal point, distortion coefficients) and maybe extrinsics (rotation, translation w.r.t world axes).
-
Geometric refinement: use detected geometric cues (vanishing points, line sets, checkerboard grid) to refine the estimates. Minimisation of reprojection error or straight-line error; the extrinsics are optimised.
-
Extrinsic estimation: If some world coordinate frames or known objects exist in the scene, you can estimate translation + rotation of camera.
-
Validation: Check reprojection error, check inserted 3D object alignment, or check consistency with expected scene metrics.
-
Use for downstream tasks: 3D reconstruction, AR object placement, measurement, robot vision.
Example Method in Practice
Let’s take a concrete example:
-
The paper “A High-Quality and Convenient Camera Calibration Method Using a Single Image” uses a single image of a printed checkerboard pattern. They derive a nonlinear objective function from straight-line constraints among the corners, estimate distortion first, then focal length and extrinsics. Results show comparable accuracy to classic multi-image methods.
-
Meanwhile, GeoCalib trains a network end-to-end to predict calibration, then uses geometry to refine and outputs uncertainties too.
In both cases, the calibration is done from just one frame. The difference is whether they depend on a controlled calibration object (checkerboard) or rely on scene inference (AI).
Relation to 3D Reconstruction
Once your camera is calibrated (you know intrinsics + extrinsics), you can map image pixels back into 3D rays, intersect with other rays or surfaces, estimate depths, derive 3D structure. Good calibration is crucial for accurate 3D reconstruction. Without it, depth estimation, measurement, and model building suffer. This is why the “3D” part of “3d camera calibration from a photo ai” is meaningful — it enables real 3D work, not just image warping.
Real-World Use Cases of 3D Camera Calibration from a Photo AI
Here are some scenarios where this capability delivers real value.
Use Case 1: Augmented Reality (AR) and Virtual Object Insertion
You have a photo of a room, you want to insert a virtual chair or object realistically. If you calibrate the camera from that photo, the virtual object will align correctly with walls/floor, shadows will match, perspective will look natural. Using a calibrated camera from one photo makes AR in static images feasible.
Use Case 2: Robotics and Drone Vision
A drone lands in a new environment, takes one photo and from that can calibrate its onboard camera quickly, enabling accurate visual mapping, obstacle detection, or measurement without extensive calibration rigs.
Use Case 3: Heritage/Architecture Photogrammetry
You have only one image of a façade (maybe from archives). Using calibration from that photo, you can estimate real world distances, building dimensions, or reconstruct partial 3D models.
Use Case 4: Mobile Apps & Consumer Use
Smartphones or tablets could have calibration built into an app: take one photo of your space, and the system calibrates the camera so that virtual furniture, decoration, or measurement tools work immediately without additional prints, markers or scaffolding.
Use Case 5: Autonomous Vehicles / ADAS
In some scenarios, calibration has to be done in the field. A quick single-image calibration using AI could allow camera systems to recalibrate after a hardware change or a camera swap without stopping the vehicle for long or requiring a calibration lane.
These examples highlight the practical impact of “3d camera calibration from a photo ai”.
Benefits & Limitations
Let’s discuss what works well — and what pitfalls to watch out for.
Benefits
-
Less labour and setup: only one image or minimal set of images needed.
-
Greater flexibility: works in uncontrolled or mobile environments.
-
Enables rapid deployment: quick calibration in the wild.
-
Improves downstream tasks: better 3D modelling, AR alignment, measurement.
Limitations
-
Accuracy lower than full multi-image calibration: While methods are improving, multi-image methods with dedicated calibration objects still often yield higher accuracy. For instance, some single-image methods note slightly worse error than the classical multi-image technique.
-
Dependence on cue quality: If the image lacks enough visual cues (no lines, no horizon, distorted scene), inference may fail or be less reliable.
-
Generalisation issues: AI models may be trained on limited datasets and might struggle with novel lenses, extreme distortions, unusual sensors or exotic optics.
-
Ambiguity inherent in a single view: Some extrinsics or scale may still be ambiguous without additional data or assumptions.
-
Distortion beyond models: If lens distortion is strong or non-standard, it may be harder to calibrate precisely.
Being aware of these limitations allows you to decide when the approach is appropriate and when a more rigorous calibration method is required.
Steps to Implement a 3D Camera Calibration from a Photo AI Workflow
If you’re interested in leveraging or implementing this yourself, here’s a practical guide.
Step 1 – Select your image
-
Ensure the photo includes enough scene features: straight edges (walls, windows), vanishing points, floor/ceiling plane, or some calibration pattern if possible.
-
Try to fill much of the field of view, minimize extreme cropping.
-
If you use a calibration pattern (checkerboard), make sure it’s visible in one shot with some angle. For single pattern approaches see the “High-Quality…” paper.
Step 2 – Pre-processing
-
Detect edges, lines, corners.
-
Estimate vanishing points, horizon, maybe floor/ceiling plane.
-
Optionally detect a calibration pattern on the image (if used).
-
Estimate distortion visually (e.g., curved lines) if possible.
Step 3 – AI Model Inference
-
Use (or train) a deep network that takes the image (or features extracted) as input and outputs estimated intrinsics + possibly extrinsics.
-
If you train your own: collect dataset of images labelled with calibration parameters (focal length, principal point, distortion, rotation, translation). See survey “Awesome-Deep-Camera-Calibration” for dataset pointers.
-
Use pretrained models (if available) for quicker setup (e.g., GeoCalib’s code).
Step 4 – Geometric Refinement
-
Use the initial model estimates and refine via nonlinear minimisation of reprojection error: known 3D-2D correspondences (like corners of a checkerboard) or line-straightness constraints.
-
For example: optimise focal length + distortion coefficients so that straight lines in world become straight in image once undistorted.
-
Incorporate vanishing point constraints for extrinsics: walls meet at a vanishing point, floor meets line etc.
Step 5 – Estimate Extrinsics (if required)
-
If you have known world points or scene geometry, compute camera pose using PnP (Perspective-n-Point) or a variant.
-
If not, you may still infer orientation (gravity direction) or rough translation using scene semantics (floor/ceiling plane) as some methods do.
Step 6 – Verify and Validate
-
Compute reprojection error of known points (how far projected points deviate). Lower error = better calibration.
-
If doing AR insertion, test by inserting a virtual object and see if alignment looks natural.
-
For measurement, compare known distances in scene to computed distances via projection.
Step 7 – Use for Downstream Applications
-
Use the calibrated camera parameters for 3D reconstruction, measurement, AR, robotics navigation, etc.
-
For 3D reconstruction: map image points onto 3D rays, intersect with other information, build model.
-
For AR: set virtual camera equal to estimated camera, render virtual objects, blend, adjust lighting if needed.
-
For robotics: use camera pose + intrinsics to project visual features into world coordinates for mapping or SLAM.
Key Considerations & Best Practices
Here are some tips to help you succeed with “3d camera calibration from a photo ai”.
-
Ensure a rich scene of cues: A single image works better if there are many straight lines, orthogonal planes (walls/floor), visible vanishing points, and some distortion to estimate.
-
Prefer wide field-of-view: If the calibration object (or scene) spans much of the image, distortion cues are higher. The single-image checkerboard method emphasises filling the field of view.
-
Avoid extreme image cropping/zooming: Valuable cues lie across the image; losing them reduces calibration accuracy.
-
Use known pattern if possible: If you can include a checkerboard or known geometry, your results will be stronger.
-
Use robust AI models: If you train your own, ensure diversity of lenses, scenes, lighting conditions, distortions.
-
Validate results: Insert a known metric object or measure distance to test calibration.
-
Watch lens distortion models: Many models assume radial and tangential distortion; if your lens uses exotic optics (fisheye), out-of-model behaviour may degrade accuracy.
-
Consider downstream error propagation: If the calibration error is significant, 3D reconstruction or measurement might suffer. Sometimes the trade-off is acceptable (e.g., AR insertion) but for metrology you may still need multi-image calibration.
The State of the Art & Research Highlights
Here’s a glance at where the research stands in “3d camera calibration from a photo ai”.
-
The paper A Perceptual Measure for Deep Single Image Camera Calibration (2018) introduced directly inferring camera intrinsics (focal length, principal point) from a single image using a CNN.
-
More recently, GeoCalib: Learning Single-image Calibration with Geometric Optimization (2024) demonstrates hybrid methods combining deep network and optimisation to outperform previous classical and learned approaches.
-
The survey Awesome‐Deep‐Camera‐Calibration tracks deep learning calibration methods through 2023/2024 and shows a growing number of publications.
-
Single image calibration with special object: A High-Quality and Convenient Camera Calibration Method Using a Single Image (2024) uses a single image of a checkerboard, achieving accuracy comparable to multi-image methods.
These works show that the field is maturing: calibration from a single image is becoming feasible and practical, especially when paired with AI.
Future Trends & Outlook
What’s coming next for “3d camera calibration from a photo ai”?
-
Better generalisation across lenses and sensors: Current trained models may struggle with unknown or exotic lens types. Future models will likely train on broader data (synthetic + real) to cover more cases.
-
Implicit calibration from large generative models: For example, the work Boost 3D Reconstruction using Diffusion-based Monocular Camera Calibration shows that diffusion models can implicitly encode camera intrinsics and may be used to estimate them.
-
Calibration without any special pattern or object at all: Truly “in-the-wild” single image calibration will become more robust, even for casual photos.
-
Embedded calibration in mobile and AR/VR hardware: Smartphone or AR systems might calibrate their camera automatically from the user’s scene with no user effort.
-
Integration with other sensors: Combining single-image calibration with IMU, lidar, or depth sensors to further improve accuracy.
-
Real-time on-device calibration: Low-resource AI models that calibrate cameras in mobile devices or edge hardware quickly.
All of these trends point toward cameras that calibrate themselves almost invisibly, enabling seamless 3D workflows.
Conclusion
The landscape of 3d camera calibration from a photo ai is exciting and practical. By leveraging a single image, paired with artificial intelligence and geometric reasoning, we can now estimate camera intrinsics and extrinsics without lengthy calibration setups. This capability unlocks faster workflows, field-ready deployments, better AR/VR, and more efficient robotics/mapping systems.
While there are limitations (accuracy trade-offs, dependency on scene cues, lens diversity), the tools and research are advancing rapidly. If you’re working with 3D reconstruction, AR content insertion, robotics vision, or mobile applications, exploring single-image, AI-driven calibration is a smart move.
In summary: calibrating a camera in 3D from just one photo with AI is no longer just a research curiosity—it’s becoming a real-world enabler. Try it, validate it, and you might save hours of tedious calibration work.
FAQs
Q1: Can I calibrate any camera with just one photo?
A1: In many cases yes — especially if the image contains rich scene cues (straight lines, vanishing points, known geometry). But if the image lacks features or uses an exotic lens (fisheye, extremely wide), accuracy may suffer. For best results, you may still need a few images or a known pattern.
Q2: How accurate is calibration from a single photo compared to multi-image methods?
A2: Generally, multi-image methods (many views of a checkerboard, etc.) still offer higher accuracy. Single-image AI methods are improving and can approach comparable accuracy in favorable scenes, but there may still be a small accuracy gap. For precision metrology you may still prefer the classic approach.
Q3: Do I need a calibration pattern (checkerboard) for AI-based single image calibration?
A3: Not always. Some methods use a calibration pattern in one image (e.g., a checkerboard) and then refine via AI. Others rely purely on natural scenes and learn from large datasets. If you can include a pattern it’s often more robust; if not, AI-only approaches may still work.
Q4: What kind of downstream applications benefit from this?
A4: Many: augmented reality (inserting virtual objects correctly), 3D reconstruction/photogrammetry, robotics and autonomous navigation (estimating camera pose), mobile apps (quick measurement or AR from one shot), heritage and architecture (reconstructing from archival images), and more.
Q5: How can I start experimenting with this?
A5: Here are some steps:
-
Find or capture a photo with decent scene structure (walls, floor, edges, etc.).
-
Look for open-source models or code (for example GeoCalib’s GitHub) to infer camera intrinsics.
-
Pre-process image: detect lines/vanishing points/corners.
-
Run inference and optionally refine via geometric optimisation.
-
Validate by inserting a virtual object or measuring known distances.
-
Iterate and test with different scenes/lenses to build confidence.


Leave a Reply